

How To You Add Templates To Proxmox
Containers are a lightweight culling to fully virtualized machines (VMs). They use the kernel of the host system that they run on, instead of emulating a full operating system (Os). This means that containers can access resources on the host system directly.
The runtime costs for containers is low, usually negligible. However, at that place are some drawbacks that need be considered:
-
Only Linux distributions tin can be run in Proxmox Containers. It is not possible to run other operating systems like, for example, FreeBSD or Microsoft Windows within a container.
-
For security reasons, admission to host resources needs to be restricted. Therefore, containers run in their own separate namespaces. Additionally some syscalls (user space requests to the Linux kernel) are non allowed within containers.
Proxmox VE uses Linux Containers (LXC) as its underlying container technology. The "Proxmox Container Toolkit" ( percentage ) simplifies the usage and management of LXC, by providing an interface that abstracts complex tasks.
Containers are tightly integrated with Proxmox VE. This ways that they are enlightened of the cluster setup, and they tin can use the same network and storage resources as virtual machines. You can likewise use the Proxmox VE firewall, or manage containers using the HA framework.
Our primary goal is to offering an surroundings that provides the benefits of using a VM, but without the additional overhead. This means that Proxmox Containers tin exist categorized equally "System Containers", rather than "Awarding Containers".
| | If yous want to run awarding containers, for example, Docker images, it is recommended that you run them within a Proxmox Qemu VM. This will give y'all all the advantages of application containerization, while besides providing the benefits that VMs offer, such equally stiff isolation from the host and the ability to alive-migrate, which otherwise isn't possible with containers. |
Technology Overview
-
LXC (https://linuxcontainers.org/)
-
Integrated into Proxmox VE graphical web user interface (GUI)
-
Easy to employ command line tool pct
-
Access via Proxmox VE REST API
-
lxcfs to provide containerized /proc file organisation
-
Control groups (cgroups) for resource isolation and limitation
-
AppArmor and seccomp to better security
-
Modernistic Linux kernels
-
Paradigm based deployment (templates)
-
Uses Proxmox VE storage library
-
Container setup from host (network, DNS, storage, etc.)
Supported Distributions
List of officially supported distributions can be found below.
Templates for the following distributions are bachelor through our repositories. You can use pveam tool or the Graphical User Interface to download them.
Alpine Linux
Alpine Linux is a security-oriented, lightweight Linux distribution based on musl libc and busybox.
For currently supported releases come across:
Arch Linux
Curvation Linux, a lightweight and flexible Linux® distribution that tries to Keep It Unproblematic.
Arch Linux is using a rolling-release model, see its wiki for more details:
CentOS, Almalinux, Rocky Linux
CentOS / CentOS Stream
The CentOS Linux distribution is a stable, predictable, manageable and reproducible platform derived from the sources of Red Hat Enterprise Linux (RHEL)
For currently supported releases see:
Almalinux
An Open Source, community owned and governed, forever-costless enterprise Linux distribution, focused on long-term stability, providing a robust production-grade platform. AlmaLinux Os is 1:1 binary compatible with RHEL® and pre-Stream CentOS.
For currently supported releases see:
Rocky Linux
Rocky Linux is a community enterprise operating system designed to be 100% bug-for-issues uniform with America's height enterprise Linux distribution now that its downstream partner has shifted direction.
For currently supported releases see:
Debian
Debian is a free operating system, developed and maintained by the Debian project. A gratuitous Linux distribution with thousands of applications to meet our users' needs.
For currently supported releases see:
Devuan
Devuan GNU+Linux is a fork of Debian without systemd that allows users to reclaim control over their organisation by fugitive unnecessary entanglements and ensuring Init Liberty.
For currently supported releases encounter:
Fedora
Fedora creates an innovative, free, and open source platform for hardware, clouds, and containers that enables software developers and community members to build tailored solutions for their users.
For currently supported releases run across:
Gentoo
a highly flexible, source-based Linux distribution.
Gentoo is using a rolling-release model.
OpenSUSE
The makers' selection for sysadmins, developers and desktop users.
For currently supported releases come across:
Ubuntu
Ubuntu is the modern, open source operating arrangement on Linux for the enterprise server, desktop, cloud, and IoT.
For currently supported releases come across:
Container Images
Container images, sometimes also referred to as "templates" or "appliances", are tar archives which contain everything to run a container.
Proxmox VE itself provides a multifariousness of basic templates for the most mutual Linux distributions. They tin can be downloaded using the GUI or the pveam (short for Proxmox VE Appliance Manager) command line utility. Additionally, TurnKey Linux container templates are also available to download.
The listing of available templates is updated daily through the pve-daily-update timer. Yous can also trigger an update manually by executing:
To view the listing of available images run:
You tin restrict this large listing past specifying the section you are interested in, for case basic system images:
List available system images
# pveam bachelor --section system arrangement alpine-three.12-default_20200823_amd64.tar.xz system alpine-3.xiii-default_20210419_amd64.tar.xz arrangement alpine-iii.14-default_20210623_amd64.tar.xz system archlinux-base_20210420-1_amd64.tar.gz system centos-7-default_20190926_amd64.tar.xz arrangement centos-eight-default_20201210_amd64.tar.xz system debian-ix.0-standard_9.7-1_amd64.tar.gz system debian-ten-standard_10.seven-1_amd64.tar.gz organisation devuan-3.0-standard_3.0_amd64.tar.gz system fedora-33-default_20201115_amd64.tar.xz system fedora-34-default_20210427_amd64.tar.xz system gentoo-electric current-default_20200310_amd64.tar.xz arrangement opensuse-15.2-default_20200824_amd64.tar.xz arrangement ubuntu-xvi.04-standard_16.04.5-1_amd64.tar.gz system ubuntu-18.04-standard_18.04.ane-1_amd64.tar.gz system ubuntu-xx.04-standard_20.04-1_amd64.tar.gz system ubuntu-20.10-standard_20.ten-1_amd64.tar.gz system ubuntu-21.04-standard_21.04-1_amd64.tar.gz
Before y'all can employ such a template, you need to download them into i of your storages. If y'all're unsure to which one, y'all can simply utilise the local named storage for that purpose. For clustered installations, it is preferred to use a shared storage so that all nodes tin admission those images.
# pveam download local debian-10.0-standard_10.0-1_amd64.tar.gz
You are at present ready to create containers using that prototype, and you lot tin listing all downloaded images on storage local with:
# pveam list local local:vztmpl/debian-10.0-standard_10.0-1_amd64.tar.gz 219.95MB
| | You can besides use the Proxmox VE web interface GUI to download, listing and delete container templates. |
pct uses them to create a new container, for example:
# pct create 999 local:vztmpl/debian-10.0-standard_10.0-1_amd64.tar.gz
The in a higher place control shows you the total Proxmox VE volume identifiers. They include the storage name, and most other Proxmox VE commands can use them. For example you can delete that image later with:
# pveam remove local:vztmpl/debian-10.0-standard_10.0-1_amd64.tar.gz
Container Settings
General Settings
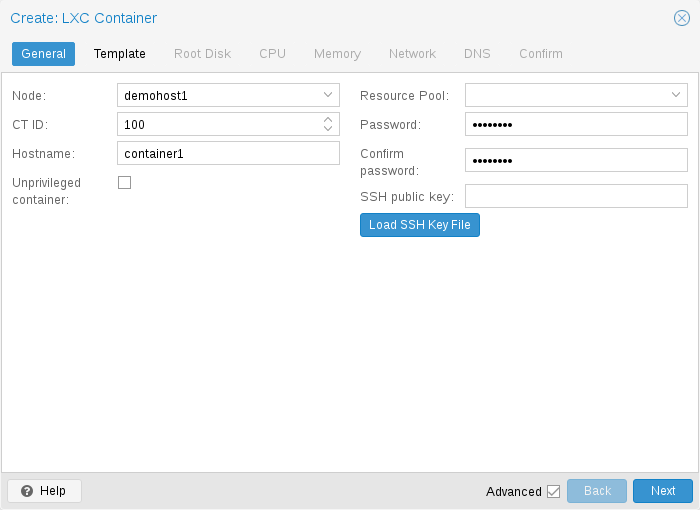
General settings of a container include
-
the Node : the physical server on which the container will run
-
the CT ID: a unique number in this Proxmox VE installation used to identify your container
-
Hostname: the hostname of the container
-
Resource Puddle: a logical grouping of containers and VMs
-
Password: the root password of the container
-
SSH Public Cardinal: a public key for connecting to the root account over SSH
-
Unprivileged container: this pick allows to cull at creation time if you lot want to create a privileged or unprivileged container.
Unprivileged Containers
Unprivileged containers utilise a new kernel feature called user namespaces. The root UID 0 inside the container is mapped to an unprivileged user exterior the container. This ways that most security issues (container escape, resource abuse, etc.) in these containers will affect a random unprivileged user, and would exist a generic kernel security bug rather than an LXC issue. The LXC team thinks unprivileged containers are safe by blueprint.
This is the default option when creating a new container.
| | If the container uses systemd as an init system, please be aware the systemd version running inside the container should be equal to or greater than 220. |
Privileged Containers
Security in containers is accomplished by using mandatory access control AppArmor restrictions, seccomp filters and Linux kernel namespaces. The LXC team considers this kind of container as unsafe, and they will not consider new container escape exploits to be security issues worthy of a CVE and quick set. That'due south why privileged containers should only be used in trusted environments.
CPU
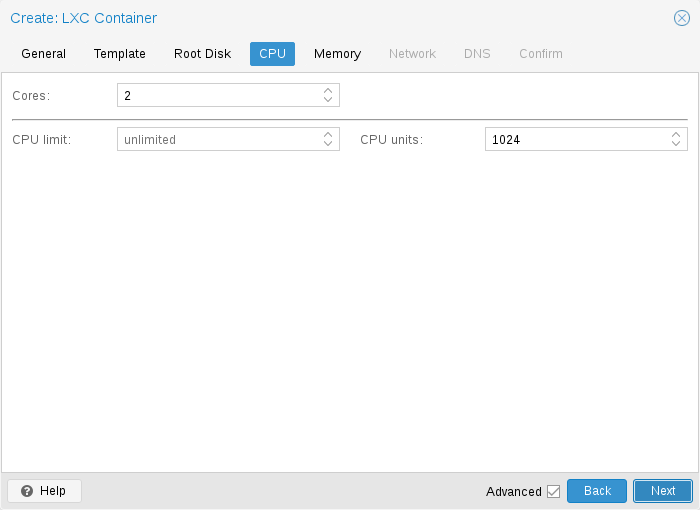
You can restrict the number of visible CPUs inside the container using the cores choice. This is implemented using the Linux cpuset cgroup (control group). A special task inside pvestatd tries to distribute running containers among available CPUs periodically. To view the assigned CPUs run the post-obit command:
# pct cpusets --------------------- 102: six seven 105: 2 3 four 5 108: 0 1 ---------------------
Containers use the host kernel directly. All tasks inside a container are handled by the host CPU scheduler. Proxmox VE uses the Linux CFS (Completely Fair Southwardcheduler) scheduler past default, which has boosted bandwidth control options.
| cpulimit : | You tin use this option to farther limit assigned CPU time. Please note that this is a floating signal number, so it is perfectly valid to assign two cores to a container, but restrict overall CPU consumption to one-half a core. |
| cpuunits : | This is a relative weight passed to the kernel scheduler. The larger the number is, the more CPU fourth dimension this container gets. Number is relative to the weights of all the other running containers. The default is 1024. Y'all tin apply this setting to prioritize some containers. |
Retention
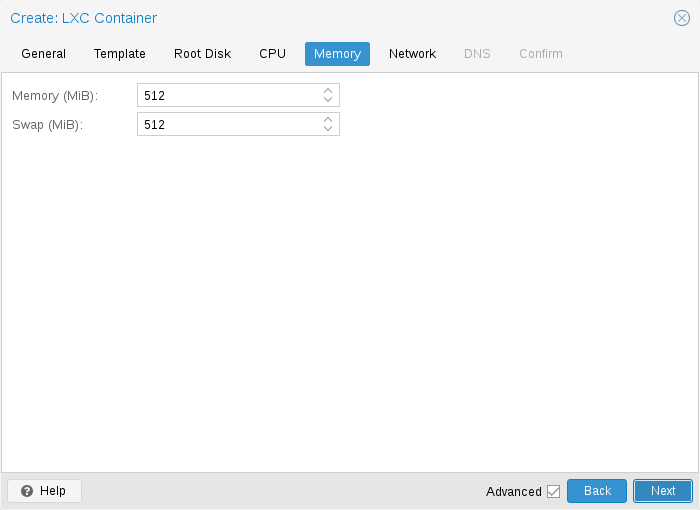
Container memory is controlled using the cgroup memory controller.
| retentivity : | Limit overall memory usage. This corresponds to the memory.limit_in_bytes cgroup setting. |
| bandy : | Allows the container to use additional bandy memory from the host swap space. This corresponds to the memory.memsw.limit_in_bytes cgroup setting, which is prepare to the sum of both value ( retention + swap ). |
Mount Points
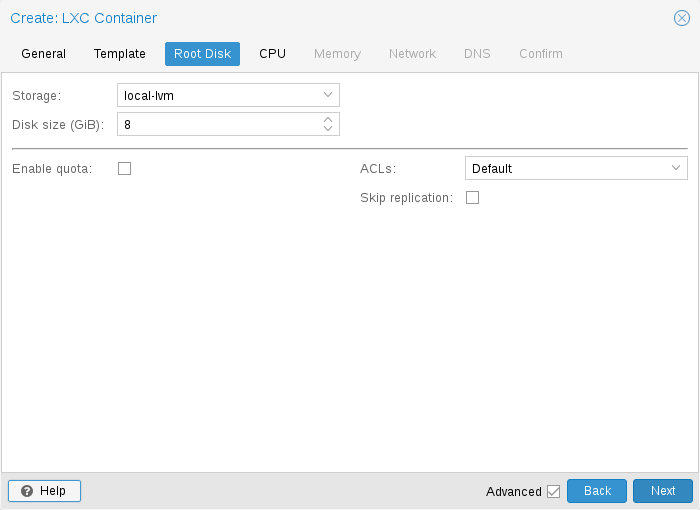
The root mountain betoken is configured with the rootfs belongings. You can configure up to 256 additional mount points. The corresponding options are called mp0 to mp255 . They can contain the following settings:
- rootfs : [book=]<volume> [,acl=<i|0>] [,mountoptions=<opt[;opt...]>] [,quota=<1|0>] [,replicate=<one|0>] [,ro=<1|0>] [,shared=<i|0>] [,size=<DiskSize>]
-
Utilize volume as container root. Encounter below for a detailed clarification of all options.
- mp[due north] : [volume=]<book> ,mp=<Path> [,acl=<ane|0>] [,backup=<ane|0>] [,mountoptions=<opt[;opt...]>] [,quota=<one|0>] [,replicate=<1|0>] [,ro=<one|0>] [,shared=<1|0>] [,size=<DiskSize>]
-
Use volume every bit container mountain point. Use the special syntax STORAGE_ID:SIZE_IN_GiB to allocate a new book.
- acl = <boolean>
-
Explicitly enable or disable ACL back up.
- backup = <boolean>
-
Whether to include the mountain point in backups (merely used for volume mount points).
- mountoptions = <opt[;opt...]>
-
Extra mount options for rootfs/mps.
- mp = <Path>
-
Path to the mountain indicate as seen from inside the container.
Must not contain any symlinks for security reasons. - quota = <boolean>
-
Enable user quotas inside the container (not supported with zfs subvolumes)
- replicate = <boolean> (default = 1 )
-
Will include this volume to a storage replica task.
- ro = <boolean>
-
Read-merely mount bespeak
- shared = <boolean> (default = 0 )
-
Mark this non-volume mount point as available on all nodes.
This choice does non share the mount point automatically, it assumes it is shared already! - size = <DiskSize>
-
Volume size (read but value).
- volume = <volume>
-
Volume, device or directory to mountain into the container.
Currently there are three types of mountain points: storage backed mount points, bind mounts, and device mounts.
Typical container
rootfsconfiguration
rootfs: thin1:base-100-disk-i,size=8G
Storage Backed Mount Points
Storage backed mount points are managed by the Proxmox VE storage subsystem and come in 3 different flavors:
-
Prototype based: these are raw images containing a single ext4 formatted file system.
-
ZFS subvolumes: these are technically bind mounts, merely with managed storage, and thus let resizing and snapshotting.
-
Directories: passing size=0 triggers a special case where instead of a raw epitome a directory is created.
| | The special choice syntax STORAGE_ID:SIZE_IN_GB for storage backed mount point volumes will automatically allocate a book of the specified size on the specified storage. For example, calling |
pct prepare 100 -mp0 thin1:10,mp=/path/in/container
will allocate a 10GB volume on the storage thin1 and supercede the volume ID identify holder 10 with the allocated volume ID, and setup the moutpoint in the container at /path/in/container
Bind Mount Points
Demark mounts permit you to access arbitrary directories from your Proxmox VE host inside a container. Some potential use cases are:
-
Accessing your home directory in the guest
-
Accessing an USB device directory in the guest
-
Accessing an NFS mountain from the host in the guest
Bind mounts are considered to not exist managed by the storage subsystem, so yous cannot make snapshots or deal with quotas from inside the container. With unprivileged containers you might run into permission bug caused by the user mapping and cannot use ACLs.
| | The contents of bind mountain points are not backed upward when using vzdump . |
| | For security reasons, bind mounts should but be established using source directories specially reserved for this purpose, eastward.one thousand., a directory hierarchy under /mnt/bindmounts . Never bind mount organisation directories similar / , /var or /etc into a container - this poses a great security risk. |
| | The bind mountain source path must not contain any symlinks. |
For example, to make the directory /mnt/bindmounts/shared accessible in the container with ID 100 nether the path /shared , use a configuration line like mp0: /mnt/bindmounts/shared,mp=/shared in /etc/pve/lxc/100.conf . Alternatively, use per centum set 100 -mp0 /mnt/bindmounts/shared,mp=/shared to reach the same result.
Device Mountain Points
Device mountain points allow to mount block devices of the host directly into the container. Similar to demark mounts, device mounts are not managed by Proxmox VE'south storage subsystem, but the quota and acl options volition exist honored.
| | Device mount points should only be used under special circumstances. In about cases a storage backed mount indicate offers the same performance and a lot more features. |
| | The contents of device mount points are non backed up when using vzdump . |
Network
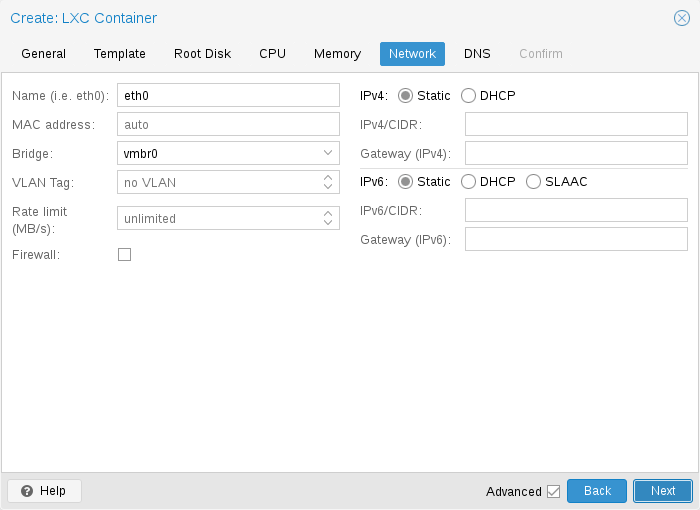
Y'all can configure up to 10 network interfaces for a single container. The corresponding options are chosen net0 to net9 , and they tin contain the following setting:
- internet[n] : name=<string> [,bridge=<bridge>] [,firewall=<ane|0>] [,gw=<GatewayIPv4>] [,gw6=<GatewayIPv6>] [,hwaddr=<XX:XX:Xx:XX:XX:XX>] [,ip=<(IPv4/CIDR|dhcp|manual)>] [,ip6=<(IPv6/CIDR|auto|dhcp|manual)>] [,mtu=<integer>] [,rate=<mbps>] [,tag=<integer>] [,trunks=<vlanid[;vlanid...]>] [,type=<veth>]
-
Specifies network interfaces for the container.
- bridge = <span>
-
Bridge to adhere the network device to.
- firewall = <boolean>
-
Controls whether this interface'due south firewall rules should exist used.
- gw = <GatewayIPv4>
-
Default gateway for IPv4 traffic.
- gw6 = <GatewayIPv6>
-
Default gateway for IPv6 traffic.
- hwaddr = <Xx:20:XX:20:XX:20>
-
A common MAC address with the I/G (Individual/Group) bit not fix.
- ip = <(IPv4/CIDR|dhcp|manual)>
-
IPv4 address in CIDR format.
- ip6 = <(IPv6/CIDR|auto|dhcp|transmission)>
-
IPv6 address in CIDR format.
- mtu = <integer> (64 - N)
-
Maximum transfer unit of the interface. (lxc.network.mtu)
- proper noun = <string>
-
Name of the network device equally seen from inside the container. (lxc.network.name)
- charge per unit = <mbps>
-
Apply rate limiting to the interface
- tag = <integer> (1 - 4094)
-
VLAN tag for this interface.
- trunks = <vlanid[;vlanid...]>
-
VLAN ids to pass through the interface
- type = <veth>
-
Network interface type.
Automatic Start and Shutdown of Containers
To automatically get-go a container when the host arrangement boots, select the pick Start at boot in the Options panel of the container in the spider web interface or run the following command:

First and Shutdown Society
If you want to fine melody the kicking order of your containers, you can apply the following parameters:
-
Start/Shutdown society: Defines the start order priority. For example, set up it to 1 if yous desire the CT to be the first to be started. (Nosotros employ the reverse startup order for shutdown, so a container with a start guild of 1 would be the terminal to be shut downwards)
-
Startup delay: Defines the interval between this container offset and subsequent containers starts. For example, set it to 240 if you want to wait 240 seconds before starting other containers.
-
Shutdown timeout: Defines the elapsing in seconds Proxmox VE should await for the container to exist offline after issuing a shutdown command. By default this value is set to 60, which means that Proxmox VE will issue a shutdown request, expect 60s for the machine to be offline, and if later on 60s the machine is all the same online volition notify that the shutdown activity failed.
Please note that containers without a Start/Shutdown gild parameter will ever start later on those where the parameter is set up, and this parameter only makes sense between the machines running locally on a host, and non cluster-wide.
If you lot require a delay between the host boot and the booting of the first container, meet the department on Proxmox VE Node Management.
Hookscripts
You can add a hook script to CTs with the config belongings hookscript .
# per centum set 100 -hookscript local:snippets/hookscript.pl
It volition be called during various phases of the guests lifetime. For an instance and documentation see the example script nether /usr/share/pve-docs/examples/invitee-example-hookscript.pl .
Security Considerations
Containers apply the kernel of the host system. This exposes an set on surface for malicious users. In general, full virtual machines provide ameliorate isolation. This should be considered if containers are provided to unknown or untrusted people.
To reduce the attack surface, LXC uses many security features like AppArmor, CGroups and kernel namespaces.
AppArmor
AppArmor profiles are used to restrict admission to possibly dangerous deportment. Some system calls, i.e. mount , are prohibited from execution.
To trace AppArmor action, use:
Although it is not recommended, AppArmor tin can be disabled for a container. This brings security risks with information technology. Some syscalls can atomic number 82 to privilege escalation when executed within a container if the system is misconfigured or if a LXC or Linux Kernel vulnerability exists.
To disable AppArmor for a container, add together the following line to the container configuration file located at /etc/pve/lxc/CTID.conf :
lxc.apparmor.profile = unconfined
| | Please note that this is not recommended for product employ. |
Control Groups (cgroup)
cgroup is a kernel machinery used to hierarchically organize processes and distribute system resource.
The principal resources controlled via cgroups are CPU time, retentiveness and swap limits, and access to device nodes. cgroups are also used to "freeze" a container before taking snapshots.
At that place are two versions of cgroups currently available, legacy and cgroupv2.
Since Proxmox VE vii.0, the default is a pure cgroupv2 environment. Previously a "hybrid" setup was used, where resource control was mainly done in cgroupv1 with an additional cgroupv2 controller which could take over some subsystems via the cgroup_no_v1 kernel command line parameter. (See the kernel parameter documentation for details.)
CGroup Version Compatibility
The main difference between pure cgroupv2 and the old hybrid environments regarding Proxmox VE is that with cgroupv2 memory and swap are now controlled independently. The memory and swap settings for containers can map directly to these values, whereas previously only the memory limit and the limit of the sum of retentiveness and swap could be express.
Another important difference is that the devices controller is configured in a completely unlike way. Because of this, file system quotas are currently non supported in a pure cgroupv2 environment.
cgroupv2 support by the container's Os is needed to run in a pure cgroupv2 environment. Containers running systemd version 231 or newer back up cgroupv2
[this includes all newest major versions of container templates shipped by Proxmox VE]
, every bit practice containers not using systemd equally init system
[for instance Tall Linux]
.
| | CentOS 7 and Ubuntu 16.10 are 2 prominent Linux distributions releases, which have a systemd version that is too old to run in a cgroupv2 environment, yous can either
|
Irresolute CGroup Version
| | If file organisation quotas are not required and all containers support cgroupv2, information technology is recommended to stick to the new default. |
To switch back to the previous version the following kernel control line parameter can exist used:
systemd.unified_cgroup_hierarchy=0
Run across this section on editing the kernel kick command line on where to add the parameter.
Guest Operating Arrangement Configuration
Proxmox VE tries to find the Linux distribution in the container, and modifies some files. Hither is a brusque list of things done at container startup:
- set /etc/hostname
-
to set the container name
- modify /etc/hosts
-
to allow lookup of the local hostname
- network setup
-
pass the complete network setup to the container
- configure DNS
-
laissez passer information almost DNS servers
- suit the init system
-
for instance, fix the number of spawned getty processes
- set the root password
-
when creating a new container
- rewrite ssh_host_keys
-
so that each container has unique keys
- randomize crontab
-
and so that cron does not start at the aforementioned time on all containers
Changes fabricated by Proxmox VE are enclosed by comment markers:
# --- Brainstorm PVE --- <data> # --- END PVE ---
Those markers will be inserted at a reasonable location in the file. If such a section already exists, information technology will be updated in place and will not be moved.
Modification of a file tin can be prevented past adding a .pve-ignore. file for it. For instance, if the file /etc/.pve-ignore.hosts exists then the /etc/hosts file will not exist touched. This tin be a simple empty file created via:
# bear upon /etc/.pve-ignore.hosts
Nigh modifications are Bone dependent, so they differ between unlike distributions and versions. You tin completely disable modifications by manually setting the ostype to unmanaged .
Bone type detection is washed by testing for sure files within the container. Proxmox VE first checks the /etc/os-release file
[/etc/os-release replaces the multitude of per-distribution release files https://manpages.debian.org/stable/systemd/os-release.5.en.html]
. If that file is not present, or it does not contain a clearly recognizable distribution identifier the following distribution specific release files are checked.
- Ubuntu
-
audit /etc/lsb-release ( DISTRIB_ID=Ubuntu )
- Debian
-
test /etc/debian_version
- Fedora
-
test /etc/fedora-release
- RedHat or CentOS
-
examination /etc/redhat-release
- ArchLinux
-
exam /etc/curvation-release
- Alpine
-
examination /etc/tall-release
- Gentoo
-
test /etc/gentoo-release
| | Container start fails if the configured ostype differs from the auto detected blazon. |
Container Storage
The Proxmox VE LXC container storage model is more flexible than traditional container storage models. A container can take multiple mount points. This makes it possible to use the best suited storage for each application.
For example the root file organization of the container tin can be on deadening and cheap storage while the database can be on fast and distributed storage via a second mount indicate. Run across department Mount Points for further details.
Any storage type supported past the Proxmox VE storage library tin can exist used. This means that containers can be stored on local (for example lvm , zfs or directory), shared external (like iSCSI , NFS ) or fifty-fifty distributed storage systems like Ceph. Advanced storage features like snapshots or clones can be used if the underlying storage supports them. The vzdump fill-in tool can use snapshots to provide consequent container backups.
Furthermore, local devices or local directories can be mounted directly using bind mounts. This gives access to local resources inside a container with practically naught overhead. Demark mounts tin be used as an like shooting fish in a barrel way to share data between containers.
FUSE Mounts
| | Because of existing issues in the Linux kernel's freezer subsystem the usage of FUSE mounts inside a container is strongly advised against, as containers demand to be frozen for append or snapshot mode backups. |
If FUSE mounts cannot be replaced by other mounting mechanisms or storage technologies, information technology is possible to establish the FUSE mountain on the Proxmox host and use a bind mount bespeak to make information technology accessible inside the container.
Using Quotas Inside Containers
Quotas allow to set limits inside a container for the amount of disk infinite that each user tin utilise.
| | This currently requires the use of legacy cgroups. |
| | This only works on ext4 image based storage types and currently only works with privileged containers. |
Activating the quota selection causes the post-obit mount options to be used for a mountain bespeak: usrjquota=aquota.user,grpjquota=aquota.group,jqfmt=vfsv0
This allows quotas to be used like on whatever other organisation. Y'all can initialize the /aquota.user and /aquota.grouping files by running:
# quotacheck -cmug / # quotaon /
Then edit the quotas using the edquota control. Refer to the documentation of the distribution running inside the container for details.
| | You demand to run the above commands for every mountain point by passing the mountain signal'southward path instead of just / . |
Using ACLs Inside Containers
The standard Posix Access Control Lists are also available inside containers. ACLs allow you to set more than detailed file buying than the traditional user/group/others model.
Backup of Container mountain points
To include a mount point in backups, enable the fill-in option for it in the container configuration. For an existing mount point mp0
mp0: guests:subvol-100-deejay-i,mp=/root/files,size=8G
add fill-in=1 to enable it.
mp0: guests:subvol-100-disk-i,mp=/root/files,size=8G,backup=1
| | When creating a new mount bespeak in the GUI, this pick is enabled by default. |
To disable backups for a mountain point, add backup=0 in the way described above, or uncheck the Fill-in checkbox on the GUI.
Replication of Containers mount points
Past default, additional mount points are replicated when the Root Disk is replicated. If you want the Proxmox VE storage replication mechanism to skip a mount bespeak, you can set the Skip replication option for that mount point. As of Proxmox VE v.0, replication requires a storage of type zfspool . Adding a mountain signal to a different blazon of storage when the container has replication configured requires to have Skip replication enabled for that mount point.
Backup and Restore
Container Backup
It is possible to use the vzdump tool for container fill-in. Please refer to the vzdump manual page for details.
Restoring Container Backups
Restoring container backups made with vzdump is possible using the pct restore command. By default, pct restore will attempt to restore every bit much of the backed up container configuration as possible. It is possible to override the backed up configuration by manually setting container options on the command line (see the pct manual page for details).
| | pvesm extractconfig can exist used to view the backed up configuration independent in a vzdump archive. |
In that location are two basic restore modes, only differing by their handling of mount points:
"Elementary" Restore Way
If neither the rootfs parameter nor any of the optional mpX parameters are explicitly set up, the mount point configuration from the backed up configuration file is restored using the following steps:
-
Extract mountain points and their options from backup
-
Create volumes for storage backed mount points on the storage provided with the storage parameter (default: local ).
-
Extract files from fill-in archive
-
Add bind and device mount points to restored configuration (limited to root user)
| | Since bind and device mount points are never backed up, no files are restored in the last step, but just the configuration options. The assumption is that such mountain points are either backed up with another mechanism (e.thou., NFS space that is bind mounted into many containers), or not intended to exist backed up at all. |
This simple mode is besides used by the container restore operations in the web interface.
"Avant-garde" Restore Mode
By setting the rootfs parameter (and optionally, any combination of mpX parameters), the pct restore control is automatically switched into an advanced mode. This advanced way completely ignores the rootfs and mpX configuration options contained in the backup archive, and instead but uses the options explicitly provided every bit parameters.
This manner allows flexible configuration of mountain point settings at restore time, for example:
-
Fix target storages, book sizes and other options for each mount point individually
-
Redistribute backed up files according to new mount indicate scheme
-
Restore to device and/or bind mount points (express to root user)
Managing Containers with per centum
The "Proxmox Container Toolkit" ( per centum ) is the command line tool to manage Proxmox VE containers. It enables you to create or destroy containers, also equally control the container execution (start, stop, reboot, migrate, etc.). It can exist used to set parameters in the config file of a container, for example the network configuration or memory limits.
CLI Usage Examples
Create a container based on a Debian template (provided you take already downloaded the template via the web interface)
# pct create 100 /var/lib/vz/template/cache/debian-10.0-standard_10.0-1_amd64.tar.gz
Outset container 100
Outset a login session via getty
Enter the LXC namespace and run a shell as root user
Display the configuration
Add together a network interface called eth0 , bridged to the host bridge vmbr0 , set the address and gateway, while information technology's running
# per centum set 100 -net0 name=eth0,bridge=vmbr0,ip=192.168.15.147/24,gw=192.168.xv.1
Reduce the retention of the container to 512MB
# pct set 100 -memory 512
Destroying a container always removes it from Access Control Lists and it e'er removes the firewall configuration of the container. Yous have to activate --purge, if you desire to additionally remove the container from replication jobs, backup jobs and HA resources configurations.
# pct destroy 100 --purge
Move a mount point volume to a different storage.
# pct motility-book 100 mp0 other-storage
Reassign a book to a different CT. This will remove the book mp0 from the source CT and attaches it as mp1 to the target CT. In the groundwork the volume is being renamed so that the name matches the new owner.
# percent move-volume 100 mp0 --target-vmid 200 --target-volume mp1
Obtaining Debugging Logs
In case pct get-go is unable to first a specific container, it might be helpful to collect debugging output by passing the --debug flag (replace CTID with the container's CTID):
Alternatively, you can use the following lxc-start command, which will save the debug log to the file specified past the -o output option:
# lxc-kickoff -n CTID -F -l DEBUG -o /tmp/lxc-CTID.log
This command volition attempt to start the container in foreground manner, to cease the container run per centum shutdown CTID or pct stop CTID in a second terminal.
The collected debug log is written to /tmp/lxc-CTID.log .
| | If you lot have changed the container's configuration since the last offset endeavour with pct start , you need to run pct kickoff at least once to also update the configuration used by lxc-outset . |
Migration
If yous have a cluster, you can migrate your Containers with
# pct drift <ctid> <target>
This works equally long as your Container is offline. If it has local volumes or mount points defined, the migration volition copy the content over the network to the target host if the same storage is defined there.
Running containers cannot alive-migrated due to technical limitations. You can do a restart migration, which shuts down, moves and and so starts a container over again on the target node. Equally containers are very lightweight, this results normally only in a downtime of some hundreds of milliseconds.
A restart migration can be washed through the spider web interface or by using the --restart flag with the pct migrate command.
A restart migration volition shut down the Container and kill information technology later on the specified timeout (the default is 180 seconds). Then information technology will migrate the Container like an offline migration and when finished, it starts the Container on the target node.
Configuration
The /etc/pve/lxc/<CTID>.conf file stores container configuration, where <CTID> is the numeric ID of the given container. Like all other files stored inside /etc/pve/ , they get automatically replicated to all other cluster nodes.
| | CTIDs < 100 are reserved for internal purposes, and CTIDs need to be unique cluster wide. |
Example Container Configuration
ostype: debian curvation: amd64 hostname: world wide web memory: 512 swap: 512 net0: bridge=vmbr0,hwaddr=66:64:66:64:64:36,ip=dhcp,proper noun=eth0,type=veth rootfs: local:107/vm-107-disk-1.raw,size=7G
The configuration files are uncomplicated text files. You tin can edit them using a normal text editor, for example, half-dozen or nano . This is sometimes useful to practise small corrections, but keep in listen that you need to restart the container to apply such changes.
For that reason, information technology is usually better to utilise the pct control to generate and modify those files, or exercise the whole thing using the GUI. Our toolkit is smart enough to instantaneously utilise nigh changes to running containers. This feature is called "hot plug", and there is no demand to restart the container in that example.
In cases where a alter cannot be hot-plugged, information technology will exist registered as a pending change (shown in cherry color in the GUI). They will only exist applied later rebooting the container.
File Format
The container configuration file uses a simple colon separated key/value format. Each line has the following format:
# this is a annotate OPTION: value
Blank lines in those files are ignored, and lines starting with a # character are treated as comments and are also ignored.
Information technology is possible to add low-level, LXC style configuration directly, for instance:
lxc.init_cmd: /sbin/my_own_init
or
lxc.init_cmd = /sbin/my_own_init
The settings are passed direct to the LXC low-level tools.
Snapshots
When y'all create a snapshot, pct stores the configuration at snapshot time into a separate snapshot section within the same configuration file. For instance, after creating a snapshot called "testsnapshot", your configuration file will look like this:
Container configuration with snapshot
memory: 512 swap: 512 parent: testsnaphot ... [testsnaphot] retention: 512 swap: 512 snaptime: 1457170803 ...
There are a few snapshot related backdrop similar parent and snaptime . The parent property is used to store the parent/child human relationship between snapshots. snaptime is the snapshot creation time stamp (Unix epoch).
Options
- curvation : <amd64 | arm64 | armhf | i386> (default = amd64 )
-
Bone compages type.
- cmode : <console | beat | tty> (default = tty )
-
Console mode. Past default, the console command tries to open a connection to one of the available tty devices. By setting cmode to console it tries to adhere to /dev/console instead. If yous set cmode to vanquish, information technology simply invokes a shell inside the container (no login).
- panel : <boolean> (default = 1 )
-
Attach a console device (/dev/console) to the container.
- cores : <integer> (1 - 8192)
-
The number of cores assigned to the container. A container can apply all bachelor cores by default.
- cpulimit : <number> (0 - 8192) (default = 0 )
-
Limit of CPU usage.
If the computer has two CPUs, it has a total of two CPU time. Value 0 indicates no CPU limit. - cpuunits : <integer> (0 - 500000) (default = 1024 )
-
CPU weight for a VM. Argument is used in the kernel fair scheduler. The larger the number is, the more CPU time this VM gets. Number is relative to the weights of all the other running VMs.
You can disable fair-scheduler configuration past setting this to 0. - debug : <boolean> (default = 0 )
-
Endeavor to be more verbose. For now this only enables debug log-level on offset.
- description : <string>
-
Clarification for the Container. Shown in the web-interface CT's summary. This is saved as comment inside the configuration file.
- features : [force_rw_sys=<1|0>] [,fuse=<i|0>] [,keyctl=<1|0>] [,mknod=<ane|0>] [,mount=<fstype;fstype;...>] [,nesting=<1|0>]
-
Allow containers access to advanced features.
- force_rw_sys = <boolean> (default = 0 )
-
Mount /sys in unprivileged containers as rw instead of mixed . This can interruption networking under newer (>= v245) systemd-network utilise.
- fuse = <boolean> (default = 0 )
-
Allow using fuse file systems in a container. Note that interactions between fuse and the freezer cgroup tin can potentially crusade I/O deadlocks.
- keyctl = <boolean> (default = 0 )
-
For unprivileged containers just: Allow the utilize of the keyctl() arrangement telephone call. This is required to use docker within a container. By default unprivileged containers will see this system phone call equally non-existent. This is mostly a workaround for systemd-networkd, as it will treat it as a fatal error when some keyctl() operations are denied by the kernel due to lacking permissions. Essentially, you can choose between running systemd-networkd or docker.
- mknod = <boolean> (default = 0 )
-
Allow unprivileged containers to use mknod() to add certain device nodes. This requires a kernel with seccomp trap to user space support (5.iii or newer). This is experimental.
- mount = <fstype;fstype;...>
-
Permit mounting file systems of specific types. This should be a listing of file system types equally used with the mount command. Note that this can have negative furnishings on the container'due south security. With access to a loop device, mounting a file tin can circumvent the mknod permission of the devices cgroup, mounting an NFS file arrangement can block the host'southward I/O completely and preclude it from rebooting, etc.
- nesting = <boolean> (default = 0 )
-
Allow nesting. Best used with unprivileged containers with additional id mapping. Annotation that this will expose procfs and sysfs contents of the host to the guest.
- hookscript : <string>
-
Script that will be exectued during various steps in the containers lifetime.
- hostname : <cord>
-
Set up a host name for the container.
- lock : <fill-in | create | destroyed | disk | fstrim | migrate | mounted | rollback | snapshot | snapshot-delete>
-
Lock/unlock the VM.
- retentiveness : <integer> (16 - N) (default = 512 )
-
Amount of RAM for the VM in MB.
- mp[n] : [book=]<volume> ,mp=<Path> [,acl=<one|0>] [,fill-in=<one|0>] [,mountoptions=<opt[;opt...]>] [,quota=<1|0>] [,replicate=<1|0>] [,ro=<i|0>] [,shared=<1|0>] [,size=<DiskSize>]
-
Utilize volume every bit container mountain bespeak. Use the special syntax STORAGE_ID:SIZE_IN_GiB to classify a new volume.
- acl = <boolean>
-
Explicitly enable or disable ACL support.
- backup = <boolean>
-
Whether to include the mountain point in backups (just used for volume mount points).
- mountoptions = <opt[;opt...]>
-
Extra mount options for rootfs/mps.
- mp = <Path>
-
Path to the mountain point every bit seen from inside the container.
Must not incorporate any symlinks for security reasons. - quota = <boolean>
-
Enable user quotas inside the container (not supported with zfs subvolumes)
- replicate = <boolean> (default = ane )
-
Volition include this volume to a storage replica chore.
- ro = <boolean>
-
Read-only mount indicate
- shared = <boolean> (default = 0 )
-
Mark this non-volume mount point as available on all nodes.
This option does non share the mount signal automatically, it assumes information technology is shared already! - size = <DiskSize>
-
Book size (read only value).
- volume = <volume>
-
Volume, device or directory to mount into the container.
- nameserver : <string>
-
Sets DNS server IP address for a container. Create will automatically use the setting from the host if you neither gear up searchdomain nor nameserver.
- net[north] : proper name=<cord> [,bridge=<bridge>] [,firewall=<one|0>] [,gw=<GatewayIPv4>] [,gw6=<GatewayIPv6>] [,hwaddr=<XX:Xx:XX:Twenty:Twenty:Xx>] [,ip=<(IPv4/CIDR|dhcp|manual)>] [,ip6=<(IPv6/CIDR|auto|dhcp|manual)>] [,mtu=<integer>] [,rate=<mbps>] [,tag=<integer>] [,trunks=<vlanid[;vlanid...]>] [,type=<veth>]
-
Specifies network interfaces for the container.
- span = <span>
-
Span to attach the network device to.
- firewall = <boolean>
-
Controls whether this interface's firewall rules should be used.
- gw = <GatewayIPv4>
-
Default gateway for IPv4 traffic.
- gw6 = <GatewayIPv6>
-
Default gateway for IPv6 traffic.
- hwaddr = <XX:XX:XX:XX:XX:XX>
-
A common MAC address with the I/G (Individual/Group) chip not set.
- ip = <(IPv4/CIDR|dhcp|manual)>
-
IPv4 address in CIDR format.
- ip6 = <(IPv6/CIDR|auto|dhcp|manual)>
-
IPv6 address in CIDR format.
- mtu = <integer> (64 - North)
-
Maximum transfer unit of the interface. (lxc.network.mtu)
- name = <cord>
-
Name of the network device as seen from within the container. (lxc.network.name)
- charge per unit = <mbps>
-
Utilise rate limiting to the interface
- tag = <integer> (i - 4094)
-
VLAN tag for this interface.
- trunks = <vlanid[;vlanid...]>
-
VLAN ids to pass through the interface
- blazon = <veth>
-
Network interface blazon.
- onboot : <boolean> (default = 0 )
-
Specifies whether a VM will be started during arrangement bootup.
- ostype : <tall | archlinux | centos | debian | devuan | fedora | gentoo | opensuse | ubuntu | unmanaged>
-
Os type. This is used to setup configuration within the container, and corresponds to lxc setup scripts in /usr/share/lxc/config/<ostype>.common.conf. Value unmanaged can be used to skip and Os specific setup.
- protection : <boolean> (default = 0 )
-
Sets the protection flag of the container. This will prevent the CT or CT'southward disk remove/update functioning.
- rootfs : [volume=]<volume> [,acl=<1|0>] [,mountoptions=<opt[;opt...]>] [,quota=<1|0>] [,replicate=<1|0>] [,ro=<ane|0>] [,shared=<1|0>] [,size=<DiskSize>]
-
Employ book equally container root.
- acl = <boolean>
-
Explicitly enable or disable ACL back up.
- mountoptions = <opt[;opt...]>
-
Extra mountain options for rootfs/mps.
- quota = <boolean>
-
Enable user quotas inside the container (not supported with zfs subvolumes)
- replicate = <boolean> (default = i )
-
Will include this volume to a storage replica job.
- ro = <boolean>
-
Read-only mount indicate
- shared = <boolean> (default = 0 )
-
Mark this not-volume mount point as available on all nodes.
This option does not share the mount signal automatically, it assumes it is shared already! - size = <DiskSize>
-
Volume size (read but value).
- book = <volume>
-
Volume, device or directory to mount into the container.
- searchdomain : <cord>
-
Sets DNS search domains for a container. Create will automatically use the setting from the host if y'all neither prepare searchdomain nor nameserver.
- startup : `[[club=]\d+] [,upward=\d+] [,down=\d+] `
-
Startup and shutdown beliefs. Guild is a non-negative number defining the full general startup order. Shutdown in done with contrary ordering. Additionally yous can set the up or downwards filibuster in seconds, which specifies a delay to await earlier the next VM is started or stopped.
- swap : <integer> (0 - N) (default = 512 )
-
Corporeality of Swap for the VM in MB.
- tags : <string>
-
Tags of the Container. This is only meta information.
- template : <boolean> (default = 0 )
-
Enable/disable Template.
- timezone : <cord>
-
Time zone to utilise in the container. If option isn't set up, and so nil volition be done. Can be fix to host to match the host time zone, or an arbitrary time zone option from /usr/share/zoneinfo/zone.tab
- tty : <integer> (0 - six) (default = two )
-
Specify the number of tty available to the container
- unprivileged : <boolean> (default = 0 )
-
Makes the container run equally unprivileged user. (Should not exist modified manually.)
- unused[n] : [volume=]<volume>
-
Reference to unused volumes. This is used internally, and should not be modified manually.
- volume = <volume>
-
The book that is not used currently.
Locks
Container migrations, snapshots and backups ( vzdump ) set a lock to prevent incompatible concurrent deportment on the affected container. Sometimes you lot need to remove such a lock manually (e.grand., later on a ability failure).
| | Only practise this if you are certain the activity which set the lock is no longer running. |
Drift container from OpenVZ to Linux container
Follow this howto:
- Catechumen OpenVZ to LXC
References
- Wikipedia Linux Container
- Linux Container
- GIT Linux Container

How To You Add Templates To Proxmox,
Source: https://pve.proxmox.com/wiki/Linux_Container
Posted by: josephphisecome.blogspot.com
0 Response to "How To You Add Templates To Proxmox"
Post a Comment